 3:51
3:51
2025-05-02 13:19
 3:05
3:05
3:05
2023-09-29 16:20
 3:10:29
3:10:29
2025-12-20 12:46
 1:55:36
1:55:36
2025-11-22 21:00
 3:12:39
3:12:39
2023-12-21 11:54
 2:32:19
2:32:19
2023-09-10 18:25
 2:40:56
2:40:56
2025-12-17 16:07
 1:29:13
1:29:13
2025-12-18 16:00
 1:02:28
1:02:28
2025-12-17 16:25
 2:58:11
2:58:11
2023-09-20 15:09
 1:03:19
1:03:19
2025-12-17 19:00
 2:21:38
2:21:38
2025-12-17 16:07
 2:13:55
2:13:55
2025-11-30 20:55
 2:37:05
2:37:05
2025-12-17 16:07
 2:33:32
2:33:32
2025-12-17 16:08
 1:48:45
1:48:45
2023-09-26 22:34
 1:57:34
![Пепел Слов - Пустота (Премьера клипа 2025)]() 2:55
2:55
![MILEN - Шёпотом (Премьера 2025)]() 4:45
4:45
![ICEGERGERT, Zivert - БАНК (Премьера клипа 2025)]() 3:00
3:00
![Султан Лагучев - Цок Цок (Премьера клипа 2025)]() 2:29
2:29
![Zemfira Ararat - Отпусти меня (Премьера клипа 2025)]() 3:45
3:45
![Шавкат Зулфикор - Узга юртда танам колиб кетмасин (Премьера клипа 2025)]() 6:27
6:27
![Артур Бесаев - Только ты (Премьера клипа 2025)]() 3:09
3:09
![Ислом Мирзо - Одам булиб колганлар (Премьера клипа 2025)]() 5:22
5:22
![Karna.val - Мы в клуб (Премьера клипа 2025)]() 2:39
2:39
![Ахрорбек Хурсаналиев - Йигитнинг гами (Премьера клипа 2025)]() 6:09
6:09
![140 ударов в минуту – Мне тебя так мало (Премьера клипа 2025)]() 3:44
3:44
![Журабек Шониёзов - Сен десам (Премьера клипа 2025)]() 3:40
3:40
![Руслан Добрый - Всё прошло (Премьера клипа 2025)]() 2:24
2:24
![Сергей Сухачёв - Королева снежная (Премьера клипа 2025)]() 3:22
3:22
![Сергей Сухачёв - Жена (Премьера клипа 2025)]() 3:49
3:49
![Алёна Свиридова - Снежинки (Премьера клипа 2025)]() 3:01
3:01
![Любовь Попова - Может однажды (Премьера 2025)]() 3:22
3:22
![Зареена Заирова - Ман кетаман (Премьера клипа 2025)]() 5:08
5:08
![Monika Chwajoł - Zostań tu jeszcze (Official Video 2025)]() 2:41
2:41
![Илхомжон Ражабов - Кет-кет (Премьера клипа 2025)]() 3:44
3:44
![Протокол выхода | Exit Protocol (2025)]() 1:24:45
1:24:45
![Шматрица | Matrix (1999) (Гоблин)]() 2:17:10
2:17:10
![Только во сне | In Your Dreams (2025)]() 1:31:16
1:31:16
![Сожалею о тебе | Regretting You (2025)]() 1:55:53
1:55:53
![Франкенштейн | Frankenstein (2025)]() 2:32:29
2:32:29
![Умри, моя любовь | Die My Love (2025)]() 1:58:57
1:58:57
![Кристи | Christy (2025)]() 2:15:04
2:15:04
![Хищник | Predator (1987) (Гоблин)]() 1:46:40
1:46:40
![Вальсируя с Брандо | Waltzing with Brando (2024)]() 1:44:15
1:44:15
![Голубая луна | Blue Moon (2025)]() 1:40:33
1:40:33
![Свинтусы | The Twits (2025)]() 1:42:50
1:42:50
![Боже. Как. Смешно. | Oh. What. Fun. (2025)]() 1:47:58
1:47:58
![Мерв | Merv (2025)]() 1:46:56
1:46:56
![Рука, качающая колыбель | The Hand That Rocks the Cradle (2025)]() 1:44:57
1:44:57
![Заклятие 4: Последний обряд | The Conjuring: Last Rites (2025)]() 2:15:54
2:15:54
![Безжалостная | Stone Cold Fox (2025)]() 1:25:31
1:25:31
![Джей Келли | Jay Kelly (2025)]() 2:13:54
2:13:54
![Кей-поп-охотницы на демонов | KPop Demon Hunters (2025)]() 1:39:41
1:39:41
![Гедда | Hedda (2025)]() 1:48:23
1:48:23
![Чёрный телефон 2 | Black Phone 2 (2025)]() 1:53:55
1:53:55
![Врумиз. 1 сезон]() 13:10
13:10
![Команда Дино. Исследователи Сезон 2]() 13:26
13:26
![Хвостатые песенки]() 7:00
7:00
![Сборники «Простоквашино»]() 1:05:35
1:05:35
![Корги по имени Моко. Волшебный мир снов]() 8:60
8:60
![Монсики]() 6:30
6:30
![Супер Зак]() 11:38
11:38
![Истории Баданаму Сезон 1]() 10:02
10:02
![Зомби Дамб]() 5:14
5:14
![Пластилинки]() 25:31
25:31
![Отважные мишки]() 13:00
13:00
![Карли – искательница приключений. Древнее королевство]() 13:00
13:00
![Синдбад и семь галактик Сезон 1]() 10:23
10:23
![МиниФорс Сезон 1]() 13:12
13:12
![Мартышкины]() 7:09
7:09
![Ну, погоди! Каникулы]() 7:09
7:09
![Поймай Тинипин! Королевство эмоций]() 12:24
12:24
![Пип и Альба Сезон 1]() 11:02
11:02
![Шахерезада. Нерассказанные истории Сезон 1]() 23:53
23:53
![Чемпионы]() 7:15
7:15
1:57:34

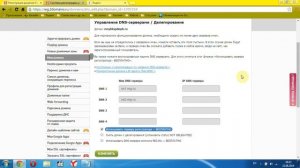
Скачать Видео с Рутуба / RuTube
| 256x144 | ||
| 426x240 | ||
| 640x360 | ||
| 854x480 | ||
| 1280x720 | ||
| 1920x1080 |
 2:55
2:55
2025-12-18 12:19
 4:45
4:45
2025-12-19 10:39
 3:00
3:00
2025-12-12 17:12
 2:29
2:29
2025-12-20 15:12
 3:45
3:45
2025-12-16 13:34
 6:27
6:27
2025-12-11 10:36
 3:09
3:09
2025-12-20 15:22
 5:22
5:22
2025-12-16 14:04
 2:39
2:39
2025-12-12 17:16
 6:09
6:09
2025-12-11 10:43
 3:44
3:44
2025-12-10 12:30
 3:40
3:40
2025-12-16 13:46
 2:24
2:24
2025-12-11 01:31
 3:22
3:22
2025-12-19 10:05
 3:49
3:49
2025-12-11 01:26
 3:01
3:01
2025-12-11 01:39
 3:22
3:22
2025-12-17 16:51
 5:08
5:08
2025-12-11 10:33
 2:41
2:41
2025-12-19 10:25
 3:44
3:44
2025-12-13 12:07
0/0
 1:24:45
2025-11-13 23:26
 2:17:10
2025-11-17 12:53
 1:31:16
2025-11-21 20:18
 1:55:53
2025-12-17 23:52
 2:32:29
2025-11-17 11:22
 1:58:57
2025-12-19 14:08
 2:15:04
2025-12-12 14:01
 1:46:40
2025-10-07 09:27
 1:44:15
2025-11-07 20:19
 1:40:33
2025-12-17 23:52
 1:42:50
2025-10-21 16:19
 1:47:58
2025-12-09 13:32
 1:46:56
2025-12-12 13:56
 1:44:57
2025-10-29 16:30
 2:15:54
2025-10-13 19:02
 1:25:31
2025-11-10 21:11
 2:13:54
2025-12-08 13:26
 1:39:41
2025-10-29 16:30
 1:48:23
2025-11-05 19:47
 1:53:55
2025-11-05 19:47
0/0
2021-09-24 16:00
2021-09-22 22:54
 7:00
7:00
2025-06-01 11:15
 1:05:35
2025-10-31 17:03
 8:60
8:60
2025-12-09 11:58
 6:30
6:30
2022-03-29 19:16
2021-09-22 22:07
2021-09-22 21:29
 5:14
5:14
2024-11-28 13:12
 25:31
25:31
2022-04-01 14:30
 13:00
13:00
2024-11-29 13:39
 13:00
13:00
2024-11-28 16:19
2021-09-22 23:09
2021-09-23 00:15
 7:09
7:09
2025-04-01 16:06
 7:09
7:09
2025-08-19 17:20
 12:24
12:24
2024-11-27 13:24
2021-09-22 23:37
2021-09-22 23:25
 7:15
7:15
2025-12-10 10:00
0/0